Monday, January 23, 2012

Useful Sites for Project Ideas

Link Moved ------------------------------>

http://embeddedsharer.blogspot.com/2012/04/useful-sites-for-project-ideas.html

Thursday, January 19, 2012

Interfacing the AT keyboard

Link Moved --------------------------------------->

http://embeddedsharer.blogspot.com/2012/04/interfacing-at-keyboard.html

Wednesday, January 18, 2012

Stepper Motors Basics

Stepper Motors

A stepper motor is a motor controlled by a series of electromagnetic coils. The center shaft has a series of magnets mounted on it, and the coils surrounding the shaft are alternately given current or not, creating magnetic fields which repulse or attract the magnets on the shaft, causing the motor to rotate.
This design allows for very precise control of the motor: by proper pulsing, it can be turned in very accurate steps of set degree increments (for example, two-degree increments, half-degree increments, etc.). They are used in printers, disk drives, and other devices where precise positioning of the motor is necessary.

There are two basic types of stepper motors, unipolar steppers and bipolar steppers.
Unipolar Stepper Motors
The unipolar stepper motor has five or six wires and four coils (actually two coils divided by center connections on each coil). The center connections of the coils are tied together and used as the power connection. They are called unipolar steppers because power always comes in on this one pole.

Bipolar stepper motors
The bipolar stepper motor usually has four wires coming out of it. Unlike unipolar steppers, bipolar steppers have no common center connection. They have two independent sets of coils instead. You can distinguish them from unipolar steppers by measuring the resistance between the wires. You should find two pairs of wires with equal resistance. If you’ve got the leads of your meter connected to two wires that are not connected (i.e. not attached to the same coil), you should see infinite resistance (or no continuity).
Like other motors, stepper motors require more power than a microcontroller can give them, so you’ll need a separate power supply for it. Ideally you’ll know the voltage from the manufacturer, but if not, get a variable DC power supply, apply the minimum voltage (hopefully 3V or so), apply voltage across two wires of a coil (e.g. 1 to 2 or 3 to 4) and slowly raise the voltage until the motor is difficult to turn. It is possible to damage a motor this way, so don’t go too far. Typical voltages for a stepper might be 5V, 9V, 12V, 24V. Higher than 24V is less common for small steppers, and frankly, above that level it’s best not to guess.
To control the stepper, apply voltage to each of the coils in a specific sequence. The sequence would go like this:
Step wire 1 wire 2 wire 3 wire 4
1 High low high low
2 low high high low
3 low high low high
4 high low low high
To control a unipolar stepper, you use a Darlington Transistor Array. The stepping sequence is as shown above. Wires 5 and 6 are wired to the supply voltage.

To control a bipolar stepper motor, you give the coils current using to the same steps as for a unipolar stepper motor. However, instead of using four coils, you use the both poles of the two coils, and reverse the polarity of the current.
The easiest way to reverse the polarity in the coils is to use a pair of H-bridges. The L293D dual H-bridge has two H-bridges in the chip, so it will work nicely for this purpose.

Once you have the motor stepping in one direction, stepping in the other direction is simply a matter of doing the steps in reverse order.
Knowing the position is a matter of knowing how many degrees per step, and counting the steps and multiplying by that many degrees. So for examples, if you have a 1.8-degree stepper, and it’s turned 200 steps, then it’s turned 1.8 x 200 degrees, or 360 degrees, or one full revolution.
Two-Wire Control
Thanks to Sebastian Gassner for ideas on how to do this.
In every step of the sequence, two wires are always set to opposite polarities. Because of this, it’s possible to control steppers with only two wires instead of four, with a slightly more complex circuit. The stepping sequence is the same as it is for the two middle wires of the sequence above:
Step wire 1 wire 2
1 low high
2 high high
3 high low
4 low low
The circuits for two-wire stepping are as follows:
Unipolar stepper two-wire circuit:

Biolar stepper two-wire circuit:

Programming the Microcontroller to Control a Stepper
Because both unipolar and bipolar stepper motors are controlled by the same stepping sequence, we can use the same microcontroller code to control either one. In the code examples below, connect either the Darlington transistor array (for unipolar steppers) or the dual H-bridge (for bipolar steppers) to the pins of your microcontroller as described in each example. There is a switch attached to the microcontroller as well. When the switch is high, the motor turns one direction. When it’s low, it turns the other direction.
The examples below use the 4-wire stepping sequence. A two-wire control program is shown for the Wiring/Arduino Stepper library only.
Wire pins 9-12 of the BX-24 to inputs 1-4 of the Darlington transistor array, respectively. If you’re using the PicBasic Pro code, it’s designed for a PIC 40-pin PIC such as the 16F877 or 18F452. Use pins PORTD.0 through PORTD.3, respectively. If you’re using a smaller PIC, you can swap ports, as long as you use the first four pins of the port.
Note that the wires read from left to right. Their numbers don’t correspond with the bit positions. For example, PORTD.3 would be wire 1, PORTD.2 would be wire 2, PORTD.1 would be wire 3, and PORTD.0 would be wire 4. On the BX-24, pin 9 is wire 1, pin 10 is wire 2, and so forth.
BX-24 code:
dim motorStep(1 to 4) as byte
dim thisStep as integer

Sub main()
    call delay(0.5)  ' start  program with a half-second delay 

    dim i as integer

    ' save values for the 4 possible states of the stepper motor leads
    ' in a 4-byte array.  the stepMotor routine will step through
    ' these four states to move the motor. This is a way to set the
    ' value on four pins at once.  The eight pins 5 through 12 are
    ' represented in memory as a byte called register.portc. We will set
    ' register.portc to each  of the values of the array in order to set
    ' pins 9,10,11, and 12 at once with each step.

    motorStep(0) = bx0000_1010
    motorStep(1) = bx0000_0110
    motorStep(2) = bx0000_0101
    motorStep(3) = bx0000_1001

    ' set the last 4 pins of port C to output:
    register.ddrc = bx0000_1111

    ' set all the pins of port C low:
    register.portc = bx0000_0000

    do
        ' move motor forward 100 steps.
        ' note: by doing a modulo operation on i (i mod 4),
        ' we can let i go as high as we want, and thisStep
        ' will equal 0,1,2,3,0,1,2,3, etc. until the end
        ' of the for-next loop.

        for i = 1 to 100
            thisStep = i mod 4
            call stepMotor(thisStep)
        next

        ' move motor backward
        for i = 100 to 1 step -1
            thisStep = i mod 4
            call stepMotor(thisStep)
        next
    loop

End Sub

sub stepMotor(byref whatStep as integer)
    ' sets the value of the eight pins of port c to whatStep
    register.portc = motorStep(whatStep)

    call delay (0.1)  ' vary this delay as needed to make your stepper step.
end sub
PicBasic Pro code:
start:
    High PORTB.0

' set variables:
x VAR BYTE
steps VAR WORD
stepArray VAR BYTE(4)
clear

TRISD = %11110000
PORTD = 255
input portb.4
Pause 1000

stepArray[0] = 001010
stepArray[1] = 000110
stepArray[2] =000101
stepArray[3] = 001001

main:
    if portb.4 = 1 then
        steps = steps + 1
    else
        steps = steps - 1
    endif

    portD = stepArray[steps //4]
    pause 2

GoTo main
pBasic (Basic Stamp 2) code:
' set variables:
x            var    byte
stepper        var    nib
steps            var    word

' set pins 8 - 10 as outputs, using DIRS to do so:
dirs.highbyte = 001111

main:
    steps = 200
    gosub clockStep
    pause 1000
    gosub counterClockStep
    pause 1000
goto main

clockStep:
    debug "counter" , cr
    for x = 0 to steps
        lookup x//4, [%1010,%1001,%0101,%0110], stepper
        outs.highbyte.lownib = stepper
        pause 2
    next
return

counterclockStep:
    debug "clockwise", cr
    for x = 0 to steps
        lookup x//4, [%0110,%0101,%1001,%1010], stepper
        outs.highbyte.lownib = stepper
        pause 2
    next
return
Wiring Code (for Arduino board):
This example uses the Stepper library for Wiring/Arduino. It was tested using the 2-wire circuit. To change to the 4-wire circuit, just add two more motor pins, and change the line that initalizes the Stepper library like so:
Stepper myStepper(motorSteps, motorPin1,motorPin2,motorPin3,motorPin4);
/*
 Stepper Motor Controller
 language: Wiring/Arduino

 This program drives a unipolar or bipolar stepper motor.
 The motor is attached to digital pins 8 and 9 of the Arduino.

 The motor moves 100 steps in one direction, then 100 in the other.

 Created 11 Mar. 2007
 Modified 7 Apr. 2007
 by Tom Igoe

 */

// define the pins that the motor is attached to. You can use
// any digital I/O pins.

#include <Stepper.h>

#define motorSteps 200     // change this depending on the number of steps
                           // per revolution of your motor
#define motorPin1 8
#define motorPin2 9
#define ledPin 13

// initialize of the Stepper library:
Stepper myStepper(motorSteps, motorPin1,motorPin2); 

void setup() {
  // set the motor speed at 60 RPMS:
  myStepper.setSpeed(60);

  // Initialize the Serial port:
  Serial.begin(9600);

  // set up the LED pin:
  pinMode(ledPin, OUTPUT);
  // blink the LED:
  blink(3);
}

void loop() {
  // Step forward 100 steps:
  Serial.println("Forward");
  myStepper.step(100);
  delay(500);

  // Step backward 100 steps:
  Serial.println("Backward");
  myStepper.step(-100);
  delay(500); 

}

// Blink the reset LED:
void blink(int howManyTimes) {
  int i;
  for (i=0; i< howManyTimes; i++) {
    digitalWrite(ledPin, HIGH);
    delay(200);
    digitalWrite(ledPin, LOW);
    delay(200);
  }
}

Tuesday, January 17, 2012

Cool Robotic Sites

Microchip Masters 2010

Huge collection of training material with ppts and sample applications for PIC controller's by microchip :

1.Getting Started with 16-bit Devices - Standard 16-bit Peripheral Configuration and MPLAB® C Compiler for PIC24 MCUs and dsPIC® DSCs (C30) Programming Techniques

2.Getting started with pic32

3.Introduction to microchip RTCC devices

4.Introduction to MPLAB X

5.Getting Started with MATLAB®, Simulink®, RTW and Microchip Device Blocksets

6.Getting to Know the Enhanced Mid-Range PIC® MCU Family Using the HI-TECH C® PRO Compiler

7.Designing and Implementing Generic Software Modules in C

8.RTOS fundamentals

9.Implementing Bootloaders on Microchip PIC® MCUs

10.Tips and Tricks for Electromagnetic Compliance (EMC)

11.eXtreme Low Power Design - XLP Tools, Design Techniques and Implementation

12.Introduction to Microchip's mTouch™ Capacitive Sensing

13.mTouch™ Capacitive Solutions

14.Techniques for Robust mTouch™ Touch Sensing Designs

15.Designing a Custom Class, Full-Speed USB Embedded Host Application

16.Wireless Networking with the MiWi™ Development Environment

17.Digital Power Conversion Using dsPIC® DSCs: SMPS Basics

18.Digital Power Conversion Using dsPIC® DSCs: Pure Sine Wave Offline UPS

19.Cheap and Easy Control of Brushless DC and Stepper Motors

20.Innovative Power Conversion Techniques for LED Lighting Applications

21.Designing with Microchip's Graphics Library

22.Designing a DSP Application Using the dsPIC® DSC

23.Getting Started with PIC16 Architecture, Instruction Set and Assembly Programming

24.PIC18 Architecture, Peripheral Configuration and MPLAB® C18 Programming Techniques

25.Designing Embedded TCP/IP Monitor and Control and Wi-Fi solutions


Here is the link and there is no password for the zip file.
Just run the start_here.html file after decompressing.


http://www.megaupload.com/?d=0YX69UVG


Enjoy .


Cheers,
Rahul .

Leading Micro-controller manufacturer links ( Fresher's Topic )

Here is link of sites of micro-controller manufacturer's :

www.nxp.com
www.microchip.com
www.st.com
www.analog.com
www.ti.com


These sites contain ample amount of resources in their knowledge base that can be of help for newbies . Experienced ones must already be knowing this , so don't need to address them .

They contain :


User Manuals -> Usually , the documents giving decriptive usage of each peripheral , architecture and other usage related deatils .

Appication Notes -> Detailed description of practical applicabillity of specific peripherals in real life applications . May be accompanied with sample codes for specific applications .


Socket Programming Link ( Windows based )

http://www.win32developer.com/tutorial/winsock/winsock_tutorial_1.shtm

For people interested in socket programming and interfacing to ethernet TCP/IP networks, easy and interesting series of tutorials .

Ultrasonic Sensor Circuit for obstacle sensing

This Ultrasonic Sensor Circuit consists of a set of ultrasonic receiver and transmitter which operate at the same frequency. When something moves in the area covered the circuit’s fine balance is disturbed and the alarm is triggered.

Following is  a working link for ultrasonic sensors based obstacle sensing :
Link for ultrasonic sensor circuit .

The sensitivity of the circuit is adjustable . So, you can reach a balance between false triggering and maximum range of the sensor . I tried many circuits but this was the only one I successfully tested . So, its better to use the tested one and save your valuable time in more productive things .


MCB900 Evaluation Board

MCB900 Evaluation Board

MCB900 Evaluation Board 
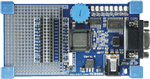
The Keil MCB900 Evaluation Board is a versatile, flexible prototype board for the NXP (founded by Philips) P89LPC93x microcontroller family. It includes the Keil µVision LPC Development Studio which allows you to create and debug programs that you can program into on-chip Flash ROM using FlashMagic.


It's a low cost development board with 8051 architecture based MCU from philips .  Well-suited for beginners . It will help you have a hands-on with Keil IDE which provides you a platform for wide range of MCU architechtures .


Comes with some useful examples implemented in Embedded C . You can test applications in simulation mode prior to buying actual hardware . The IDE is freely available from www.keil.com .

Any queries regarding the board are most welcome . 


Cheers ,

Rahul .

Monday, January 16, 2012

Best book on Basics of practical Electronics

THE ART OF ELECTRONICS BOOK :

http://rapidshare . com/files/4081042/ The_Art_of_Electronics_-_Horowitz___Hill.pdf...l.pdf.html


This book has got very nice concepts of basic electronics . A good insight of basic hardware is quite helpful in testing and debugging the final application . It also reduces efforts of software development because many a times we try to find a problem in our code when our hardware has some issues especially in low budget projects where hardware specific support is limited from vendor side or online resources .

So, its in your best interest if you can deal with general hardware problems yourself .


Cheers ,
Rahul Khurana .

NXT Gripper

Gripping robot based on NXT robotics kit . I have actually tested this . It has a simple mechanism with a nice grip . I have experimented this mechanism with different orientations like vertically suspended one with ability to grip objects lying on floor from top .

The nxt kit is very popular in robotics world and is a good help for understanding mechanisms for customized designs .


Saturday, January 14, 2012

Introduction

Hi everyone ,


I have started this blog with an objective of sharing useful knowledge related to the field of embedded systems . This can be of immense help for the beginners as well as expert developers in this field . I would also like to encourage newcomers to find their interest in this exciting field . Something that can give you a kick-start and provide useful insight of the technology that is indispensable in the present time .


Hoping to get a positive response from the readers .


Regards ,
Rahul Khurana ,
Owner and Administrator ,
embeddedshare.blogspot.com .